TL;DR
Direct grilling cooks food quickly over high heat and is best for thin or fast-cooking items like steaks, burgers, and veggies, while indirect grilling uses lower, surrounding heat for slower cooking of large or tough cuts like roasts or whole chickens; the choice depends mainly on thickness and cook time, and sometimes both methods are combined for the best results.
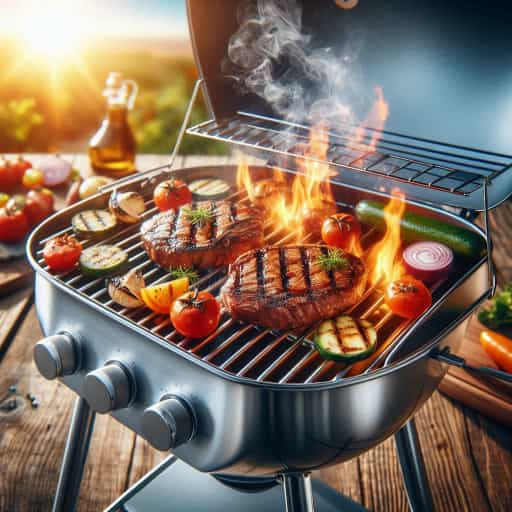
- Direct grilling uses high heat directly under food, making it ideal for thin, quick-cooking items like burgers, steaks, seafood, and vegetables because it sears fast and adds charred flavour.
- Indirect grilling cooks food beside the heat source with the lid closed, acting like an oven and working best for large or tough cuts such as ribs, roasts, and whole chickens.
- The main factor in choosing a method is thickness and cook time: thin foods suit direct heat, while thick foods need slower indirect heat to cook evenly without burning.
- A two-zone grill setup lets you manage flare-ups, move food as needed, or combine methods by searing first and finishing slowly.
- Proper prep, temperature control, thermometers, cleaning, and safe tools are essential for consistent results, better flavour, and safe grilling.
Direct grilling, simply put, is cooking food directly over the heat source. It’s like the rockstar of grilling methods, giving you that quick sear and those enviable grill marks everyone craves.
You’d want to go with direct grilling when you’re dealing with foods that cook quickly. Think burgers, hot dogs, thin steaks, chops, and veggies. Anything that would benefit from a rapid cook time to keep it juicy and tender on the inside is perfect for direct grilling.
The beauty of direct grilling is in its simplicity. You get fast, hot, and intense heat straight from the source, delivering that mouthwatering char and smokiness that’s hard to beat. Plus, it’s pretty straightforward—less setup, less fuss.
Some examples? Burgers and sausages for your garden BBQ, prawns for a quick seafood fix, and even thin-cut chicken breasts for a weeknight meal. Direct heat does magic with these.
But, it’s not just tossing meat on a grill. Mastering direct grilling means keeping an eye on your food to avoid those dreaded flare-ups and ensuring even cooking. Trust me, vigilance is key here!
For a perfect direct grilling session, always preheat your grill properly. This means getting your grates piping hot before placing anything on them. Clean the grates too. A clean grill ensures better heat distribution and reduces sticking—nobody likes their meat ripped apart, right?
Consider using two cooking zones on your grill–one for intense direct heat and the other cooler in case you need to move things around quickly. This way, if something starts cooking too fast, you have a safe zone to avoid burning.
Getting to Know Indirect Grilling
Indirect grilling is like the gentle giant of the barbecue world. Instead of placing the food directly over the heat source, you set it off to the side. Essentially, you’re turning your grill into an oven with a lid-on approach, using ambient heat to cook the food slowly and evenly.
You’d use indirect heat when you’re working with larger cuts of meat or foods that need a longer cooking time without burning the exterior. Think whole chickens, ribs, pork shoulders, and roasts. These cuts benefit immensely from the lower, slower cook to break down connective tissues and render fat, giving you that tender, juicy end product everyone loves.
Setting up for indirect grilling is pretty straightforward. If you’re using a gas grill, just turn on one or two burners and leave the others off. Place your food on the cooler side. For charcoal grills, pile the coals only on one side of the grill, leaving the other side empty. Add a drip pan filled with a little water under the food to catch drippings and maintain humidity.
One common challenge with indirect grilling is maintaining a consistent temperature. Using a grill thermometer can help you keep an eye on things. Aim for a temp range of about 225°F (110C) to 300°F (150C), depending on what you’re cooking.
Safety is crucial with indirect grilling. Since it usually involves longer cooking times, always monitor your grill closely. Check for any signs of flare-ups and keep a spray bottle of water handy to control any unexpected flames. Never ignore basic safety—use long-handled tools and heat-resistant gloves to prevent burns.
Choosing the Right Method for Different Meats
Grilling isn’t one-size-fits-all, especially when it comes to different types of meat. Knowing when to use direct or indirect grilling can make a world of difference in flavour, texture, and overall quality of your barbecue spread.
Direct grilling works wonders on thinner cuts and quick-cooking meats. Picture a juicy burger sizzling to perfection or a tender piece of fish getting that perfect sear. Think simplicity and speed here. Steaks, chops, and kababs? They fall right into this category too. You want those nice grill marks and a crust that seals in the juices.
Now, when it comes to indirect grilling, it’s all about the heavy hitters. Whole chickens, large roasts, thick ribs – these need that low-and-slow approach. The indirect method helps keep the meat moist while cooking it thoroughly, resulting in a tender bite that’s full of flavor. Pulled pork lovers, you know exactly what I’m talking about!
Sometimes, a combination method works best. Start with direct heat to sear the meat, giving it a flavorful crust, then switch to indirect to finish cooking it through. This is perfect for meats like thick steaks or chops where you want both a good sear and even cooking without drying out the center.
The thickness and cut of your meat play a huge role in selecting your grilling method. Thicker cuts generally take longer to cook, so indirect heat helps prevent the outside from burning while the inside cooks properly. Thin cuts, meanwhile, benefit from that quick, direct burst of heat to lock in flavors without overcooking.
Regardless of the method, never underestimate the power of good preparation. Proper seasoning, marinades, and rubs can elevate your grilling game whether you’re using direct or indirect heat. Pat your meat dry before seasoning to ensure a perfect sear and always let it rest after cooking to allow the juices to redistribute.

Enhancing Your Grilling Skills: Tips and Tricks
Grilling isn’t just about fire and meat; it’s an art, and like any art, it has its secrets. Getting things right starts with mastering temperature control. A two-zone fire setup—one side hot, the other cooler—offers flexibility. This arrangement helps manage different cooking stages and prevents burning.
Invest in a reliable meat thermometer. Forget guesswork—knowing your meat’s internal temperature guarantees perfect doneness. Aim for an internal temp of 145°F (62C) for pork, 165°F (75C) for poultry, and 135°F (56C) for medium-rare beef. Don’t rely on the meat’s exterior color alone.
Marinades, rubs, and brines are your best friends for flavour infusion. A good marinade not only adds taste but also helps tenderize tougher cuts. Rubs create a flavourful crust, while brines keep meat juicy. Apply these techniques at least an hour before grilling, and for the best results, let your meat soak overnight.
Time management is crucial. If you’re juggling multiple items on the grill, start with the foods that take longer, like potatoes or bone-in chicken. As they near completion, add quicker-cooking items like veggies or seafood. This way, everything finishes at the same time, making for a seamless meal.
Infusing more flavour can be as simple as adding wood chips or chunks to your charcoal or using flavoured wood pellets in a pellet grill. Hickory, apple, and mesquite woods add different flavours, from sweet to smoky. Just soak the wood in water for about 30 minutes before adding to your grill for enhanced smoky aromas.
Safety and Maintenance: Keeping Your Grill in Top Shape
A great grilling experience starts with a well-maintained and properly functioning grill. Not only does this ensure your food tastes amazing, but it also keeps you safe while you cook.
Let’s talk cleaning. After each use, give your grill grates a good scrub while they’re still warm. Use a stiff wire brush to remove any leftover food particles and debris. For a deeper clean, occasionally soak the grates in warm soapy water, then scrub away stubborn residue.
Regularly check your gas grill’s burners and tubes. Make sure they’re free of blockages to maintain a consistent flame. For charcoal grills, empty the ash catcher after each use. Built-up ash can block the vents, affecting airflow and cooking temperature.
Safe grilling practices are essential. Always use long-handled tools to keep a safe distance from the heat. Heat-resistant gloves can provide extra protection, especially when working with hotter zones or rearranging coals.
Flare-ups can happen, especially with fattier meats. Keep a spray bottle of water handy to douse any unexpected flames quickly. If things get too out of control, move your food to the cooler side of the grill until it settles down.
Storing your grill properly prolongs its life. Once cooled, cover your grill with a weather-resistant cover to protect it from the elements. If you live in an area with harsh winters, consider storing your grill in a shed or garage when not in use.
Having the right tools can make grilling safer and more enjoyable. Essentials include a sturdy spatula, long tongs, a meat thermometer, and those ever-handy heat-resistant gloves. With these, you can handle almost any grilling scenario with confidence.
**This post contains affiliate links. If you make a purchase through these links, I may earn a commission at no extra cost to you.**
Take a look at this multipack of smoking chips to up your barbecue flavours – https://amzn.to/4fpHlZE